With Magento, customization becomes more and more simple. It allows users to create and define their own APIs and also extend the core API. The web service concept comes into picture when you need to provide your own API from your website to other parties.
Here we will discuss how to create your own API. By default, Magento supports SOAP, but it can also be made to work with XML-RPC.
To access SOAP web service, load WSDL from URL as
http://magentohostname/api/soap/?wsdl
To access Magento API V2 http://magentohostname/api/v2_soap/?wsdl=1
Here let’s check how it works with V2.
These are the basic steps for creating custom API.
First create your web service, and then assign a role to it.
-
Go to the Magento Admin panel and create a role.
-
Create a web service user
-
Then assign a role to the user.
Use these steps to create your own API
-
Tell Magento about the model you use.
-
Create config.xml file of your Model
-
Create api.xml file
-
Create Model for API Method
-
Create wsdl.xml file
-
Create your php file to call your web service
-
Create role in Magento Admin
In the Magento Admin Panel, create a role
Go to System->Web Service->SOAP/XML-RPC – Roles in the Magento Admin panel. You will require to define the role name as myrole and save it. You can then define the resources to the roles under Role Resource tab.
Assigning role to a user
Under User Roles tab, you can assign user roles to users.
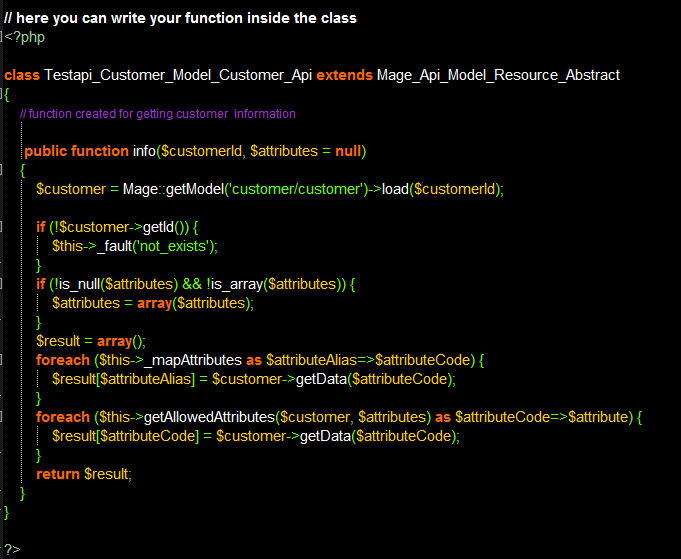
In this example we shall create API for getting information from the user.
Module Directory Structure should be like this:
Magento

|–app
|–code
|      |—-local
|              |—-Testapi
|                       |—-Customer
|                                  |—-Model
|                                  |       |—-Customer
|                                  |                   |—-Group
|                                  |                   |        |—-Api
|                                  |                   |                |—-V2.php
                 |                                  |                   |——Api.php
                 |                                  |—-etc
|                                          |—-api.xml
                 |                                          |—-config.xml
                 |                                          |—-wsdl.xml
                 |–etc
|—-modules
|–Testapi_Customer.xml
I. = >Tell Magento about your model
app/etc/modules/Testapi_Customer.span
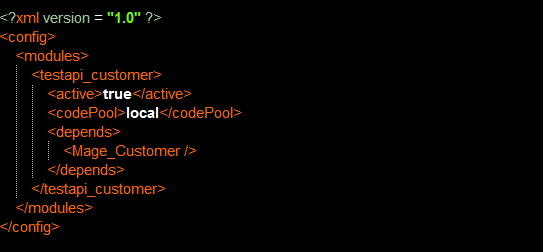
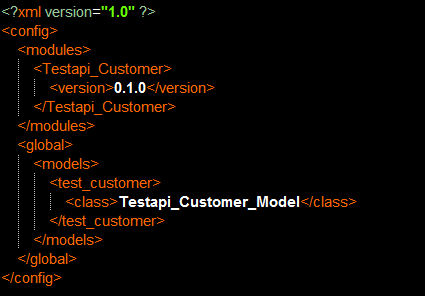
II => Create config.xml file of your Model
testapi/customer/etc/config.xml
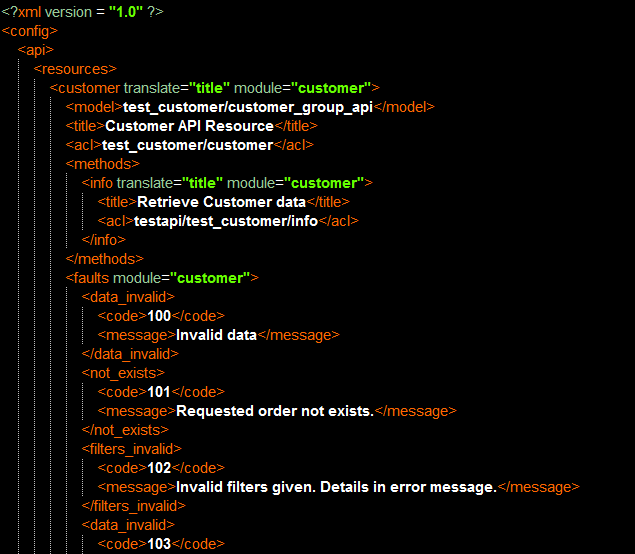
III. = > Create api.xml file
testapi/customer/etc/api.xml
IV.=> Create Model for API Method
create testapi/customer/model/customer/group/api/V2.php
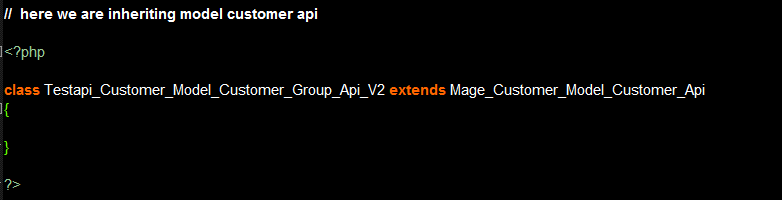
Create testapi/customer/model/customer/Api.php
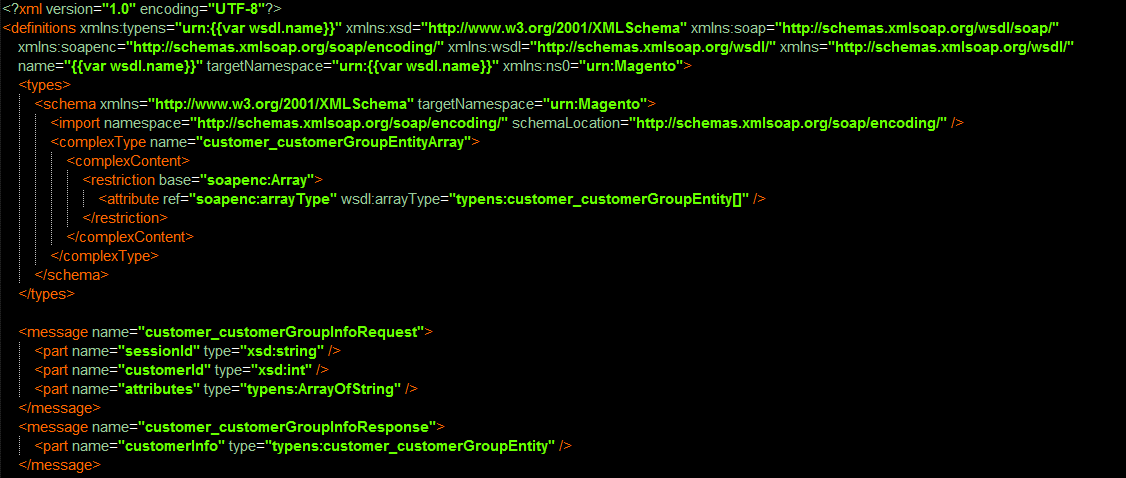
V. = > Create wsdl.xml file
testapi/customer/etc/wsdl.xml
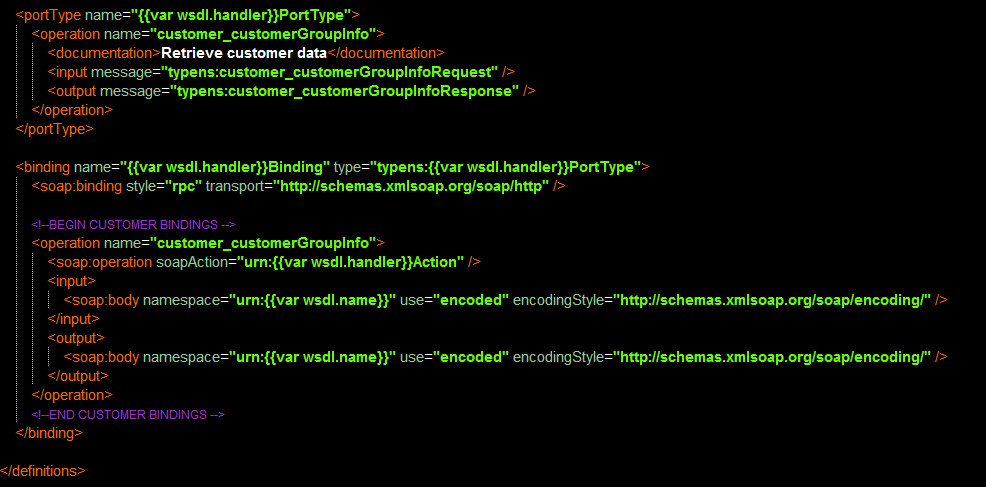
Now, after making the wsdl, you can check whether the browser displays the defines message, operation etc by running http://magentowebsite/api/v2_soap/?wsdl=1.
If it’s showing then you created your web service successfully.
Next , let’s check how clients call this.
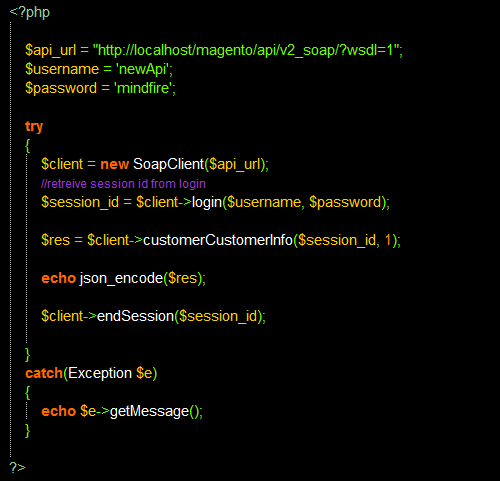
VI. = >Create your PHP file to call your web service
Create PHP file in the root directory and name it anyname.php. User name and password is same as you defined for web service. Then create a SOAP client.
For V1:
$res = $client->call($session_id, ‘customer.info’, array());
For V2:
$res = $client->customerCustomerInfo($session_id, argument);